Monday 27 April 2015

Model Making Part 2

We used clay to create a box for the model to sit in and which has to be tightly sealed and thick walls in order to form the top half of the mold.


Take a good rest in the mold making compound!
I did not have chance to mix the compound but it has a thick texture and exothermic.


This is the finish (half) mold and we need to repeat the same steps on the other side in order to complete the mold.


When the second half is also finished, it is the coming of the most difficult part...taking the model out! This requires so much effort and patient and skills. My model is slightly damaged when taking it out and therefore I immediately go repairing. Next, there are so many clay stick in the mold which needs to be taken out perfectly otherwise it will affect the finish foam model as the clay will block the space and lead to imperfection.


After the mold is cleaned up, foam latex is poured in and I have to rotate the mold so that to make sure the latex reaches every space inside the mold.


Finish!!! I have done two latex models in total. The first one is not as good as the second one because it loses its nose and the details of its belt. I figured out the problem which is the sticking clay therefore I removed them carefully with smaller tools and water. The second model is much better with greater details and richer foams.


This induction is the highlight of this year, I enjoy it so much and so much new stuffs to learn. Don is very nice and patient to teach us how to create a good model who is extremely helpful and generate a good study atmosphere. The modelling skills would definitely help in the future when I want to do clay motion or it simply provide more option when choose working media. However it is time consuming, skill based and special materials required which might need to prepare early before the production.

Model Making part 1

We are so excited about the modelling brief as non-computer sections are very valuable! I have designed a character who is a witch with normal girl figure. We first need to measure the portion of the character and use a combined wire to form the foundation of the model.


Next is the amazing milliput! It will turn rock hard when set so we use it as the limbs and the head. It tooks about an hour for it to set so ..be patient!


The next step is to make the body using modelling clay and the milliput needs to be covered by plaster before in order to prevent slipping.


*The eyes are made by milliput.
I carefully create my ideal shape of the witch and try to include details like hair and ears. It is difficult to be precise and steady hands are needed when smoothing the surfaces and creating characteristics.


The twins tails need to take away when molding because it is too thin and might get damaged. It could be added on after the model is finished.


Everyone's work!


I enjoy the induction so much and I like modelling character using real materials like clay than by computer. This encourages me to give more time and patient to the model so it is full of love! In spite of the lack of crafting briefs of this year's course, my crafting skill is not as rusty as I thought which is quite impressing. Also this is a good opportunity to experience the production of a real model and how to prepare it which is extremely valuable to our portfolio. I cannot wait for the next lesson when we are molding our models!


Thursday 23 April 2015

Particle playground vs Particle world

 After a lot of experimenting, I decided to use Particle world instead of particle playground because it has more useful settings comparatively. More detailed like birth rate, 3D space and textures can be controlled and can create more realistic particle effects.


I figured out this method to create falling petals = Choose the particle type-> textured polygon-> texture-> choose the petal layer form the composition
The rotation option allows natural looking falling patterns and I have also learnt the relationship between velocity and gravity in the Particle World.


Test 1: the petals are falling way too fast, I reduced the gravity.


Test 2: the speed is normally acceptable but can be improved


Test 3: the best result I get. Hope the wind sound effect can go well with it.


I have also introduce a falling petal onto the cup of sake. I used wiggle which is learnt from the aftereffect induction and the petal now is very naturally floating on top. 

Tiltle sequence part 2 development

Backgrounds decision:

1)I like the continuos wiping motion in this watercolour painting and the blending of colours is also not bad. However, it might not show 'raining' as good as the second background and the top is too dark.


2)I like the soaking and dripping effects of this background. Comparing to the first background, I think this is more suitable to a rainy condition.


I want to darken the colour to make it even more gloomy!


Process:

I scanned in the umbrellas and each rotates in different speed in a composition in after effect. They are arranged in various layers so as to create depths when the umbrellas are sliding from left to right with easy ease tool.

I have tried out a lot of possibilities about how the umbrellas should move and this is the best out of the experiments.


Learning from the youtube video about motion graphic helps so much with understanding the tools and how to create some text effects. I have learnt to scale the text, arrange the appearing order and also the layout of the text with the composition.


The background will be changed at the very end of the project (If it is successfully worked out) and hence let the text stands out.  I appreciated the effort I put in and very proud of myself. What's next, I need to complete the first part and figure out the transition between scenes. I have spent 2-3 days on this which is not bad, still have enough time to experiment.


Title sequence Research- Watch the Titles

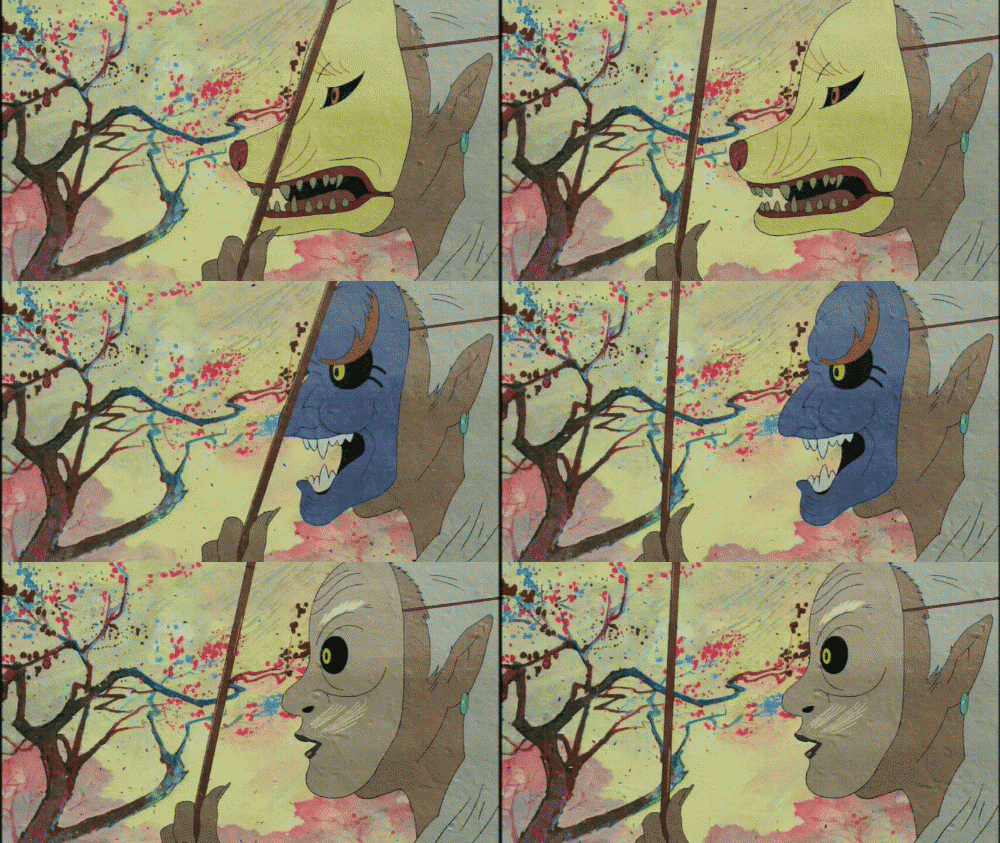
Princess Raccoon


I found this title sequence contains essence of 'A Cup of Sake Beneath the Cherry Blossom Trees' for example the cherry blossom trees and oriental layout that could be taken in. I especially like the use of silhouette because it encourages the audiences to cooperate with imaginations.

The texture of the animation is also fantastic. I can see a lot of layering with a variety of materials, light source and even photographs. The horizontally moving images can easily introduce the timeline and the content of the story which is clever used in this title sequence. 


Priceless


This is title sequence is very similar to my umbrella concept which show different patterns umbrella horizonally in a timeline. Each umbrella is unique and represent different character in this title sequence with carefully designed patterns that also introduce the main characters before the movie. I like the drawing style, the white outline stands out from the colourful patterns and the black background, forming a simple and clean composition for the title sequence.


Tuesday 21 April 2015

After Effects Experiment

This is an experiment I did in After Effects, playing around with different effects and tools, wish to know more about the programme before starting the project. I have asked Matt for help and he gave me so much useful information and techniques in creating natural looking falling petals.

This picture is found on the internet, suitable for experimenting. First, I need to have the image that fall from the cherry tree, in this case the flower petal,


also the image needs to be in PNG form (without background) which can be done by photoshop.


The petal is ready!


There are a lot of similar effects like waterfall and snowfall. Since the colour of the snow can be alternated, the snow looks quite similar to cherry blossom when it is in pink. However, the Particle Playground is a better method to create falling petals. It includes velocity, gravity and birth rate such options that can reproduce realistic falling motions but it takes a lot of time to understand the mechanisms and I definitely need more time to experiment.


I have also learnt to use the camera tool to film the sequence with different perspective which is useful when changing focus from background to the character.


Experiments:

Snowfall effect


Particle playground effect


Storyboards and watercolour experiment

Storyboard: basically the title sequence is separated into two part with two different content ( two paragraphs selected from the book), the first part is where the monk sitting beneath the cherry blossom trees and enjoying a cup of sake, the second part is a rainy night that the monk is left behind by a group of people.


Concepts

I want some unique Japanese umbrellas so I have created these patterns using watercolours and masking fluid, hoping they can perform well within the sequence.


These are my favourites, the masking fluid allows the drawing surface to be 'untouched' and therefore beautiful patterns could be shown while mixing watercolours on the paper.
I have failed these one... bad circle drawing skill.
Not really sure about the colour combination...but I will still use them, maybe put them behind the pretty ones?
I want this simplistic umbrella be the monk's umbrella. I think this can represent the monk's personality and Buddhism. 

For the first part, I painted a petal for the particle playground effect also the background with salt effect that I am really impressed with. The salt effect allows more textures and layers in the painting, the blurriness is dream-like according to the paragraph it refers to: Cherry blossom has the power to bring you back to the cherished memory.


Close up on the cup of sake, I want to add ripple effect on the surface of the sake when the petal falls. 

I am happy working with watercolour and introducing different texture to the digital animation. I think this could show a lot about myself and my oriental culture when deciding on the styles. This  could be challenging because I am experimenting with After effect which I have never officially used it before for a project! I am planning to finish at least half of the sequence during Easter included all the testings and playing around with the programme, wish me luck!

Title sequence Styles

About the style, the traditional Japanese art style is a mixture of colours and patterns. It instantly reminds me of an anime called Mononoke. This anime has an unique aesthetic unlike usual anime which many traditional painting methods were used and texturised the background by old parchment paper. 

''The directing and art have been called "boldly confrontational."It blends a murder mystery structure with "twist of supernatural and a shake of historical, peppered with plenty of stylistic experimentation." It frequently achieves "the ideal - great directing combined with great animation." The Mainichi newspaper said it could not be dismissed as a mere experiment, and that the story's themes were every bit as advanced as the digital animation techniques employed.'' http://en.wikipedia.org/wiki/Mononoke_(TV_series)#Reception 

I wish my title sequence could be partly hand-drawn with Japanese traditional art style according to the content and message behind. 


The patterns on the umbrella gave me inspiration to present the atmosphere of the essay. '' Really, what a wretched thing the human heart is!'' this sentence could be visualised with a lonely personal left behind by a group of friends and family in a rainy day, how fragile and mentally weak human is when being alone.


I have also look into different painting techniques of cheery blossom trees. This splashing texture reminds me of the salt effect I have learnt in High school which salt is place on top of the watercolour painting to absorb excess water, beautiful marks would appear after dry out that give similar effects as the picture below. I want to experiment with watercolour backgrounds with salt and possibly with masking fluid as well.

This is more like ink than watercolour, the colour is more vibrant and the strokes brings a lot of rhymes to the brunches and blossoms. However, this might not be useful in my idea as I am not drawing the whole cherry blossom tree in details and painting each blossom is too time consuming.